2024.05.06 프로그래머스-DB설계 + ERD 작성 & 간이 포트폴리오 제작
오늘 배운 내용
- ERD 작성해보기
- DB 설계? 해보기
- 간이 포트폴리오 웹 페이지 구축해보기
오늘은 프로그래머스에서 2개의 개인 과제가 나왔는데,
하나는 개인 포트폴리오 간단하게 만들어보기,
다른 하나는 페이지를 제시 받고, 페이지 기반 DB를 설계해보고 ERD를 작성해보기
DB설계 및 ERD 작성
- 제시된 페이지는 티몬의 공연 티켓을 구매하는 것과 비슷한 느낌의 페이지 였다.
- 상품구매하고, 회원이 그 상품을 구매한 내역을 저장하는 느낌!
화면 구성
- 메인페이지
- 상품 이미지 및 이미지 리스트 표시
- 상품 상세 페이지
- 상품 1개에 대한 상세정보 표시
- 상품명
- 상품가격
- 상품날짜
- 상품설명
- 상품 구매 버튼
- 상품 1개에 대한 상세정보 표시
- 로그인 페이지
- 아이디, 비밀번호, 로그인 버튼, 회원가입 버튼
- 회원가입 페이지
- 이름, 이메일, 비밀번호, 회원가입 버튼
- 주문내역 페이지
- 주문번호
- 주문 일자
- 구매 상품명, 상품 날짜, 상품 가격
- 구매자 이름, 구매자 이메일, 구매 수량, 총 구매 가격
ERD 작성
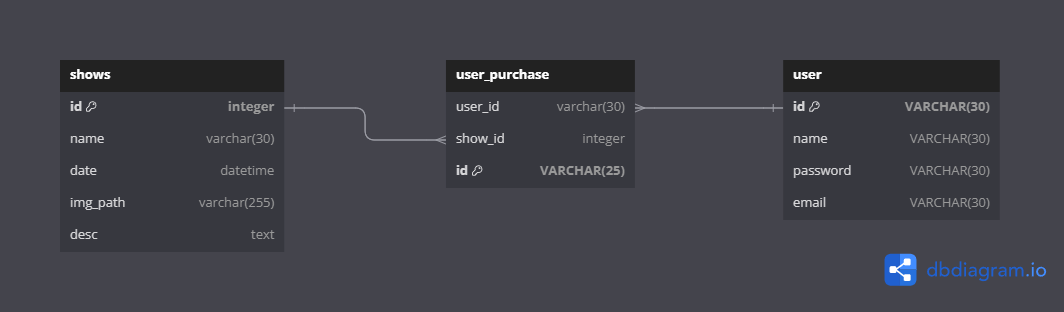
- shows 는 상품 정보 Table
- 상품의 정보가 저장된다.
- PK : id
- user 는 회원 정보 Table
- 회원의 정보가 저장된다.
- PK : id
- user_purchase 는 구매 정보 Table
- 구매 정보가 저장된다.
- FK : user_id (from user.id), show_id (from shows.id)
- PK : id
간이 포트폴리오 구축해보기
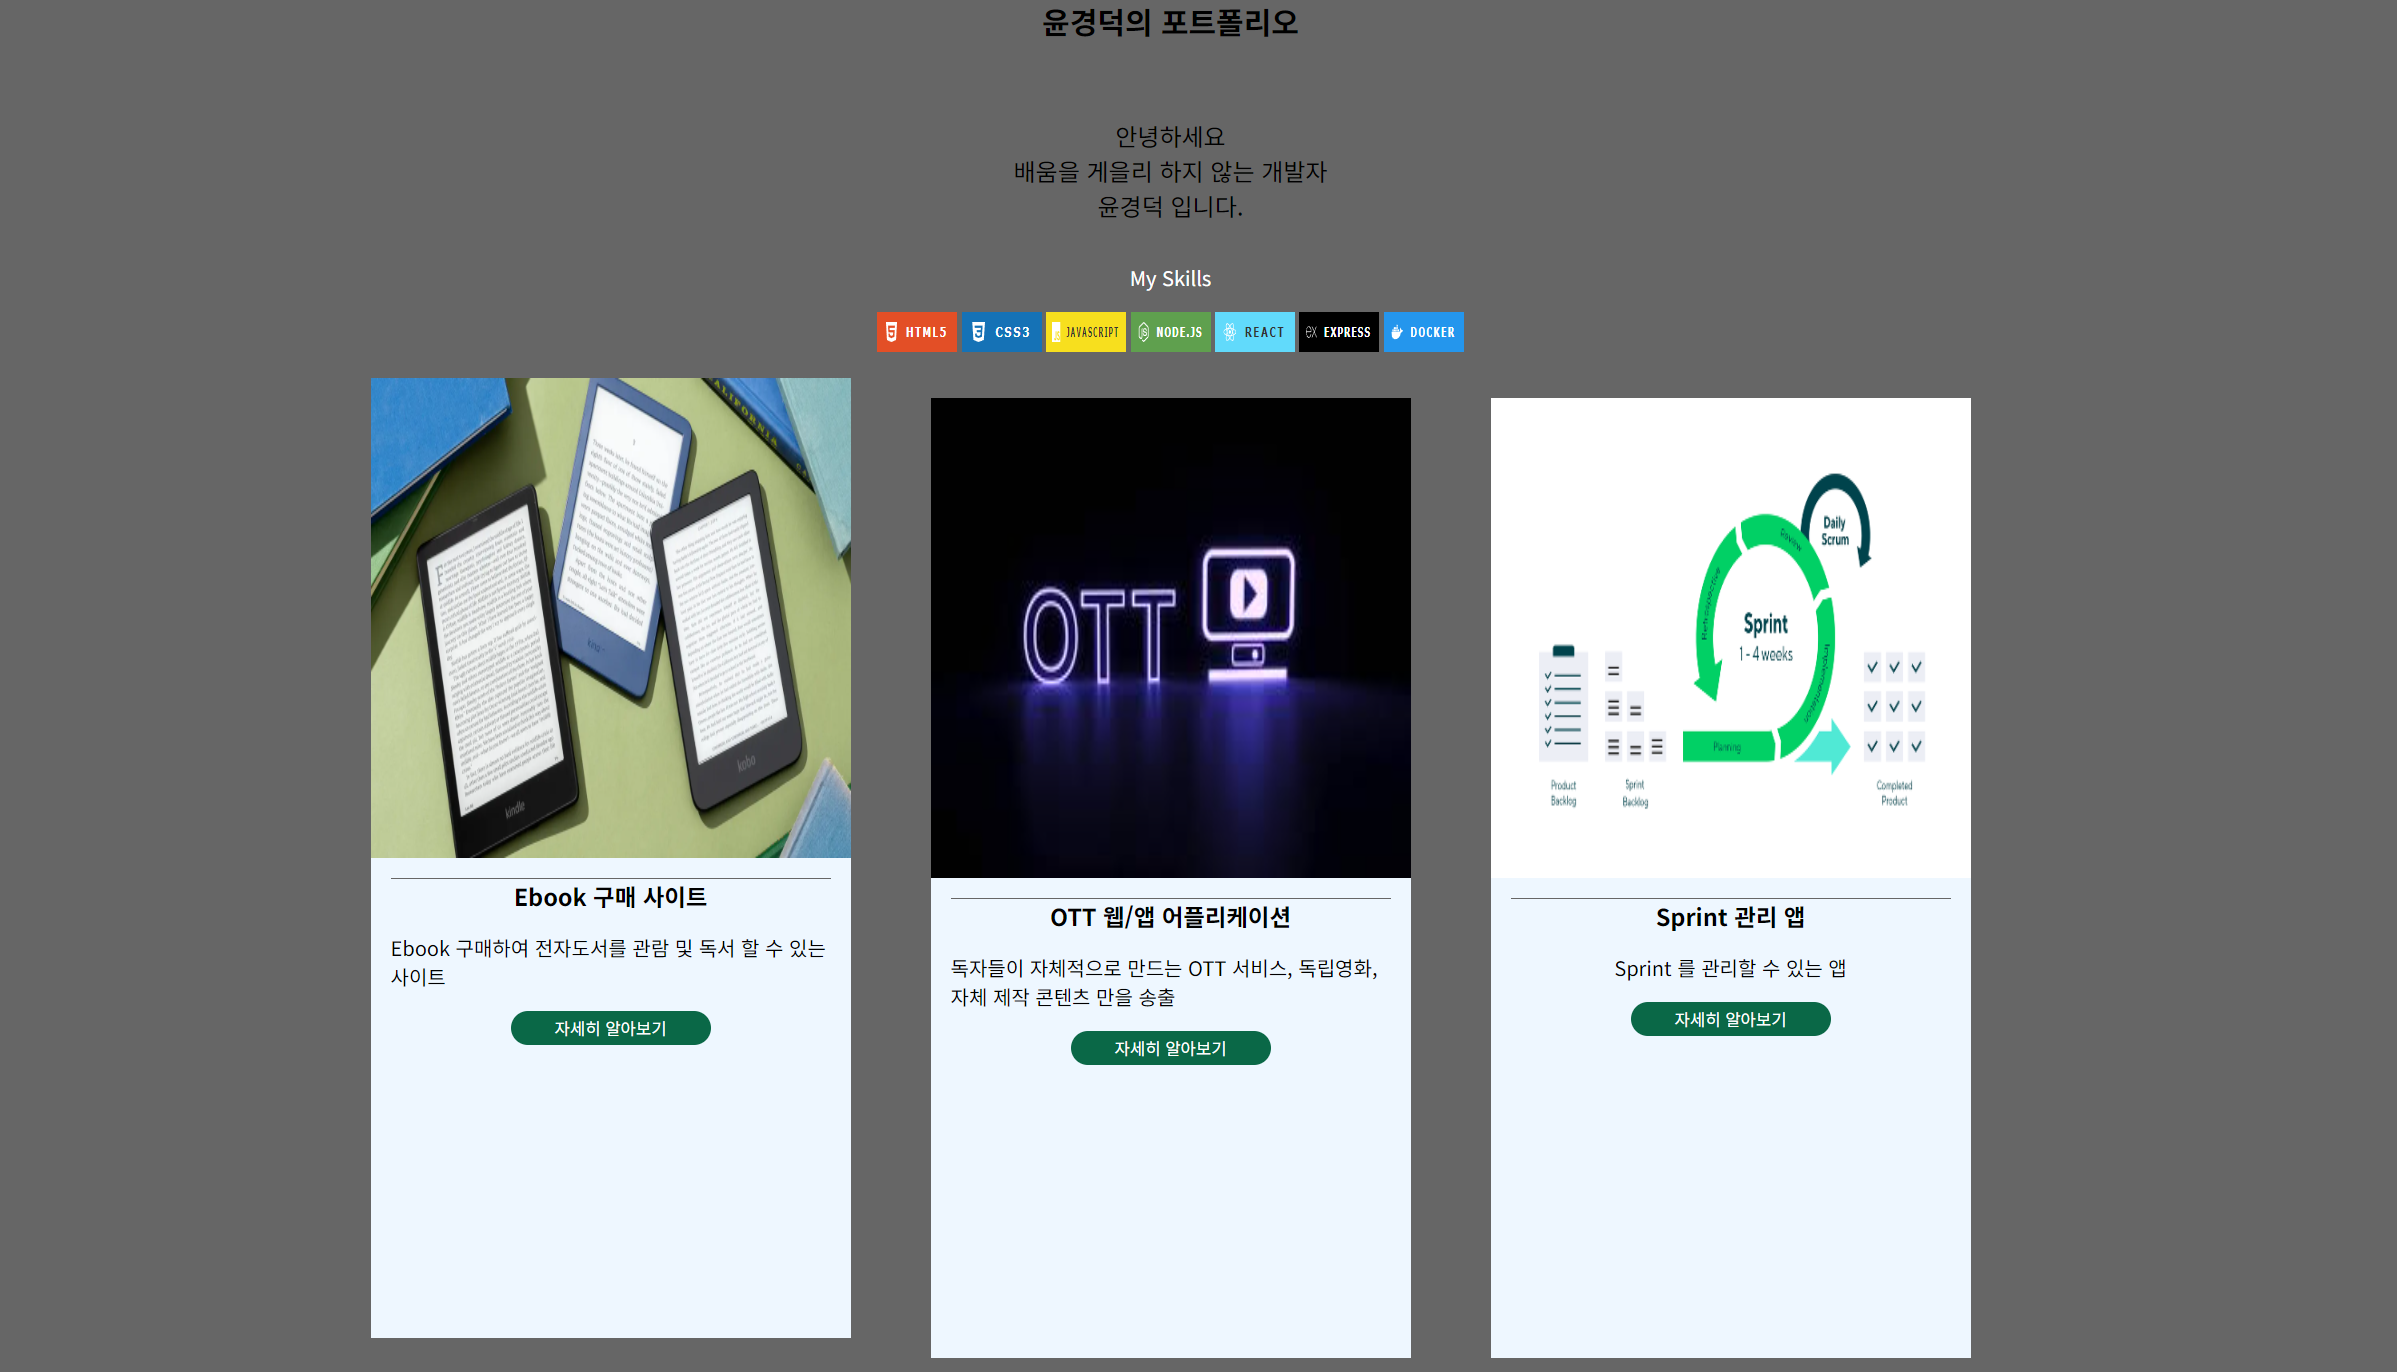
- 만들어 보고 싶었던 기능
- 각 card (프로젝트) 마다 hover시 위로 조금씩 움직이는 애니메이션이 발생
- github pages 배포
index.html
1 2 3 4 5 6 7 8 9 10 11 12 13 14 15 16 17 18 19 20 21 22 23 24 25 26 27 28 29 30 31 32 33 34 35 36 37 38 39 40 41 42 43 44 45 46 47 48 49 50 51 52 53 54 55 56 57 58 59 60 61 62 63 64 65 66 67 68 69 70 71 72 73 74 75 76 77 78 79 80 81 82 83 84 85 86 87 88 89 90 91 92 93 94 95 96 97 98
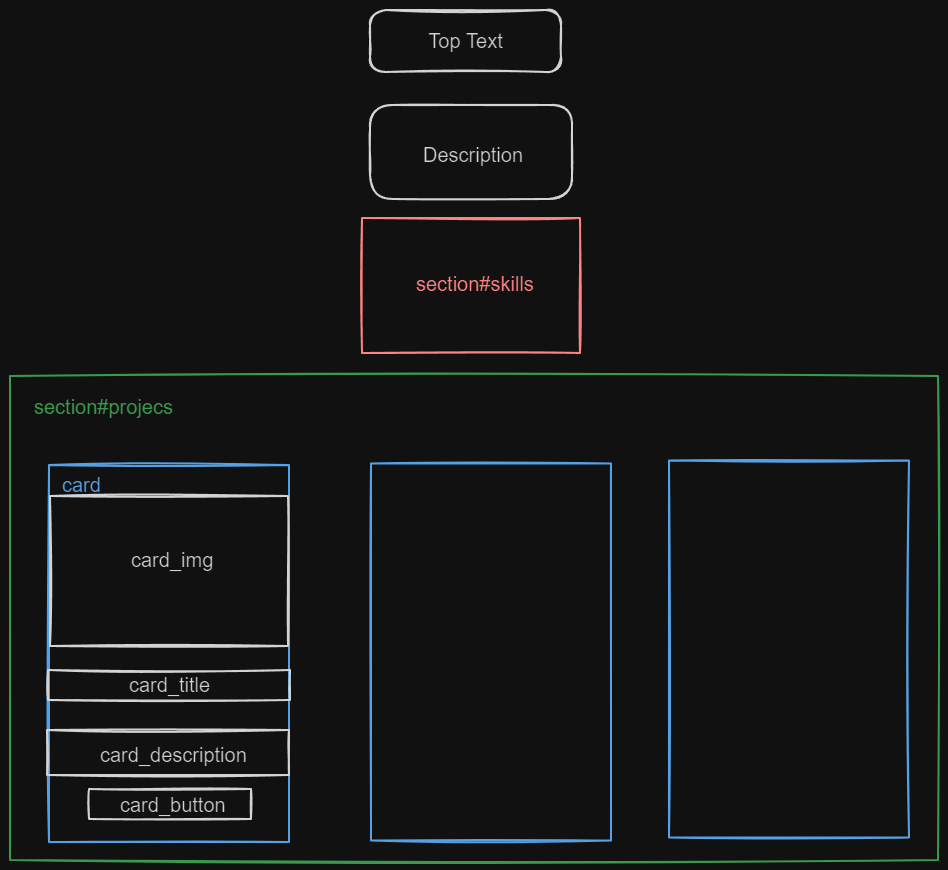
<!DOCTYPE html> <html> <head> <meta charset="UTF-8" /> <meta name="viewport" content="width=device-width, initial-scale=1.0" /> <title>윤경덕 포트폴리오</title> <link rel="stylesheet" href="./style/index.css" /> <link rel="preconnect" href="https://fonts.googleapis.com" /> <link rel="preconnect" href="https://fonts.gstatic.com" crossorigin /> <link href="https://fonts.googleapis.com/css2?family=Noto+Sans+KR:wght@100..900&display=swap" rel="stylesheet" /> </head> <body> <section id="top"> <h1>윤경덕의 포트폴리오</h1> </section> <section id="description"> <p>안녕하세요</p> <p>배움을 게을리 하지 않는 개발자</p> <p>윤경덕 입니다.</p> </section> <section id="skills"> <p>My Skills</p> <div class="skill"> <img alt="HTML5" src="https://img.shields.io/badge/html5-E34F26?style=for-the-badge&logo=html5&logoColor=white" /> <img alt="CSS3" src="https://img.shields.io/badge/css3-1572B6?style=for-the-badge&logo=css3&logoColor=white" /> <img alt="Javascript" src="https://img.shields.io/badge/javascript-F7DF1E?style=for-the-badge&logo=javascript&logoColor=white" /> <img alt="Node.js" src="https://img.shields.io/badge/Node.js-5FA04E?style=for-the-badge&logo=Node.js&logoColor=white" /> <img alt="React" src="https://img.shields.io/badge/React-61DAFB?style=for-the-badge&logo=React&logoColor=white" /> <img alt="Express" src="https://img.shields.io/badge/Express-000000?style=for-the-badge&logo=Express&logoColor=white" /> <img alt="Docker" src="https://img.shields.io/badge/Docker-2496ED?style=for-the-badge&logo=Docker&logoColor=white" /> </div> </section> <section id="projects"> <div class="card"> <img class="card_image" src="./assets/img/ebook.png" alt="ebook image" /> <h3 class="card_title">Ebook 구매 사이트</h3> <span class="card_desciprtion"> Ebook 구매하여 전자도서를 관람 및 독서 할 수 있는 사이트 </span> <button class="card_button">자세히 알아보기</button> </div> <div class="card"> <img class="card_image" src="./assets/img/OTT.png" alt="ebook image" /> <h3 class="card_title">OTT 웹/앱 어플리케이션</h3> <span class="card_desciprtion" >독자들이 자체적으로 만드는 OTT 서비스, 독립영화, 자체 제작 콘텐츠 만을 송출</span > <button class="card_button">자세히 알아보기</button> </div> <div class="card"> <img class="card_image" src="./assets/img/agile-sprint.png" alt="ebook image" /> <h3 class="card_title">Sprint 관리 앱</h3> <span class="card_desciprtion">Sprint 를 관리할 수 있는 앱</span> <button class="card_button">자세히 알아보기</button> </div> </section> </body> </html>
- 각 section 별로 id를 지정하여 스타일을 지정하였다
index.css
1
2
3
4
5
6
7
8
9
10
11
12
13
14
15
16
17
18
19
20
21
22
23
24
25
26
27
28
29
30
31
32
33
34
35
36
37
38
39
40
41
42
43
44
45
46
47
48
49
50
51
52
53
54
55
56
57
58
59
60
61
62
63
64
65
66
67
68
69
70
71
72
73
74
75
76
77
78
79
80
81
82
83
84
85
86
87
88
89
90
91
92
93
94
95
96
97
98
99
100
101
102
103
104
105
106
107
108
109
110
111
112
113
  * {
    box-sizing: border-box;
    margin: 0;
    padding: 0;
    font-family: "Noto Sans KR", sans-serif;
    font-optical-sizing: auto;

    font-style: normal;
  }

  img {
    width: 24rem;
    height: 24rem;
  }

  body {
    display: flex;
    flex-direction: column;
    align-items: center;
    /* background: linear-gradient(to bottom right, #666666, #999999); */
    background-color: #666666;
    height: 100vh;
  }

  button {
    cursor: pointer;
  }

  #top {
    margin: 1.5rem;
    padding: 4px;
  }

  #description {
    text-align: center;
    margin: 2rem 0;
    font-size: 1.2rem;
  }

  #projects {
    display: flex;
    flex-wrap: wrap;
    align-items: center;
    justify-content: center;
    gap: 2rem;
    margin-top: 1rem;
    margin-bottom: 1rem;
  }

  #projects .card {
    height: 48rem;
    margin: 1rem;
    padding: 1rem;
    padding-top: 0;
    background-color: #eef7ff;
    width: 24rem;
    display: flex;
    flex-direction: column;
    align-items: center;
    gap: 1rem;
    transition: bottom 0.3s ease;
  }

  #projects .card:hover {
    transform: translateY(-1rem);
    transition: transform 0.3s ease-in-out;
  }

  #projects .card:not(:hover) {
    transform: translateY(0);
    transition: transform 0.2s ease-in-out;
  }

  #projects .card .card_title {
    border-top: 1px solid #666666;
    width: 100%;
    text-align: center;
  }

  #projects .card .card_description {
    word-wrap: break-word;
  }

  #projects .card .card_button {
    outline: none;
    background-color: #0a6847;
    border: none;
    padding: 4px;
    width: 10rem;
    border-radius: 1rem;
    color: #fff;
    transition: 0.3s;
  }

  #projects .card .card_button:hover {
    background-color: #7aba78;
  }

  #skills {
    width: 100%;
    text-align: center;
  }

  #skills p {
    color: #fff;
    margin-bottom: 1rem;
  }

  #skills img {
    width: 4rem;
    height: 2rem;
  }
### Github Pages 배포

- Repository의 settings 로 이동
- Pages 옵션 이동
- Source : ‘Deploy From branch’ 옵션 선택
- save 버튼 클릭
- 이미 github.io repository가 있다면, 그 이름으로 배포한 url의 서브 url로 접속할 수 있게된다.
- 나의 경우 이미 github.io로 블로그를 배포하여 돌고있는 상태
- https://ykdman.github.io/portfolio.io
이 기사는 저작권자의 CC BY 4.0 라이센스를 따릅니다.