모두의 운동 게시판 모.운.게 개발로그 1 - msw
모운게 project : Mock 서버 세팅
- 프로젝트에서 Mock 서버를 사용하기 위해 postman 이 아닌
msw를 사용하여 Mock 서버를 구축하기로 했다.
(프로젝트는 React+Vite+TS+ SWC) 환경이다.
설치
설치 스크립트
1
  npm i msw --save-dev
init 스크립트
1
  npx msw init <PUBLIC_DIR>/ --save
위의 스크립트를 처음에 계속 쳤는데
could not determine executable to run라는 에러메세지만 계속 나왔었다.이전에 강의에서 본 msw 설치 부분을 다시 쭉 살펴봐도 틀린 게 없없는데
실제 스크립트에서는 init 과 msw 위치를 바꾸어 적어서 안됐다…
msw가 init 앞에 위치하는 것이 맞다!
위의 스크립트까지 실행하면, public 폴더에도
mockServiceWorker.js라는 파일도 생겨났을 것이다.
worker 설정
우선 나는 프로젝트의 src/mock/browser.ts 파일에
mock의 worker 부분을 실행 시킬 코드를 작성하였다.
1
2
3
4
5
6
7
import { setupWorker } from "msw/browser";
import { getCategory } from "./category.mock";

const handler = [getCategory];

export const worker = setupWorker(...handler);
- setupWorker를 통해 핸들러로 받은함수들을 api 함수로 사용하게 된다.
실제 mocking 하기 위한 api 함수는 아래와 같이 예시로 작성하였다.
1
2
3
4
5
6
7
8
9
10
11
12
13
14
15
16
17
18
19
20
import { http, HttpResponse } from "msw";

const CATEGORY = [
  {
    id: "category_1",
    name: "루틴 게시판",
  },
  {
    id: "category_1",
    name: "장비 게시판",
  },
];

export const getCategory = http.get(
  `${import.meta.env.VITE_API_BASE_URL}/category`,
  () => {
    return HttpResponse.json(CATEGORY, { status: 200 });
  }
);
간단하게 하드코딩으로 category 부분에 대한 response.json 데이터를 만들었고,
이 변수가 url/category 로 get 요청에 대한 응답 값이 된다.
이제는 msw의 worker 가 일을 할 수 있게 구성해줘야 한다.
main.tsx
1
2
3
4
5
6
7
8
9
10
11
12
13
14
15
16
17
18
19
20
  import React from "react";
  import ReactDOM from "react-dom/client";
  import App from "./App.tsx";
  import "./index.css";

  async function mountApp() {
    if (import.meta.env.MODE === "development") {
      const { worker } = await import("./mock/browser.ts");
      await worker.start();
    }

    ReactDOM.createRoot(document.getElementById("root")!).render(
      <React.StrictMode>
        <App />
      </React.StrictMode>
    );
  }

  mountApp();
이전에 CRA로 리액트를 만들었을 때는, require 구문이 작동하여서 worker를 require문으로 불러왔었는데
vite는 require 구문을 아예 사용할 수 없다.
그래서 위와 같이 async 함수를 통해, 현재 production 환경이 개발 환경이라면, await를 통해 worker를 import 하여
start 실행 까지 진행하도록 작성하였다.
Chrome 개발자 도구 console
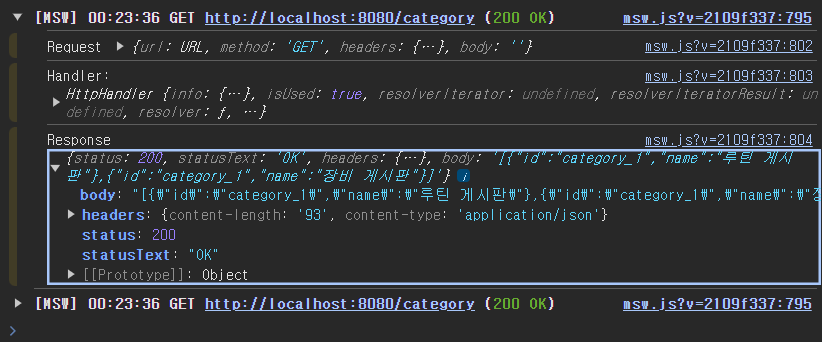
(React.strictMode 로 인해 두 번 실행 된 모습!)