React redux 입문하기
Redux
- 상태 관리 패키지
- Cross-Components 또는 App-Wide State 관리
State 의 종류
- Local State
- 단일 컴포넌트에서 사용되는 State
- Cross-Component State
- 다수의 컴포넌트에 영향을 미치는 State
- App-Wide State
- App 전체에 영향을 미치는 State
Redux 🆚 Context
- 하나의 App 에서 Redux, Context 둘 다 사용할 수 있다.
- 중앙 상태 저장소
- 하나의 저장소에 모든 데이터를 저장한다.
Context 의 잠재적 단점
- App의 크기가 커지고 여러 상태가 필요하게 되는 상황
- 정말 많은 provider가 필요할 수 있고, 중첩된 provider가 몇개가 될지 모른다.
- 때문에 context 관리가 더욱이 복잡해질수 있다.
- 성능적인 측면
- 고빈도의 상태 변화가 필요한 App에서는 context의 성능이 좋지 않다.
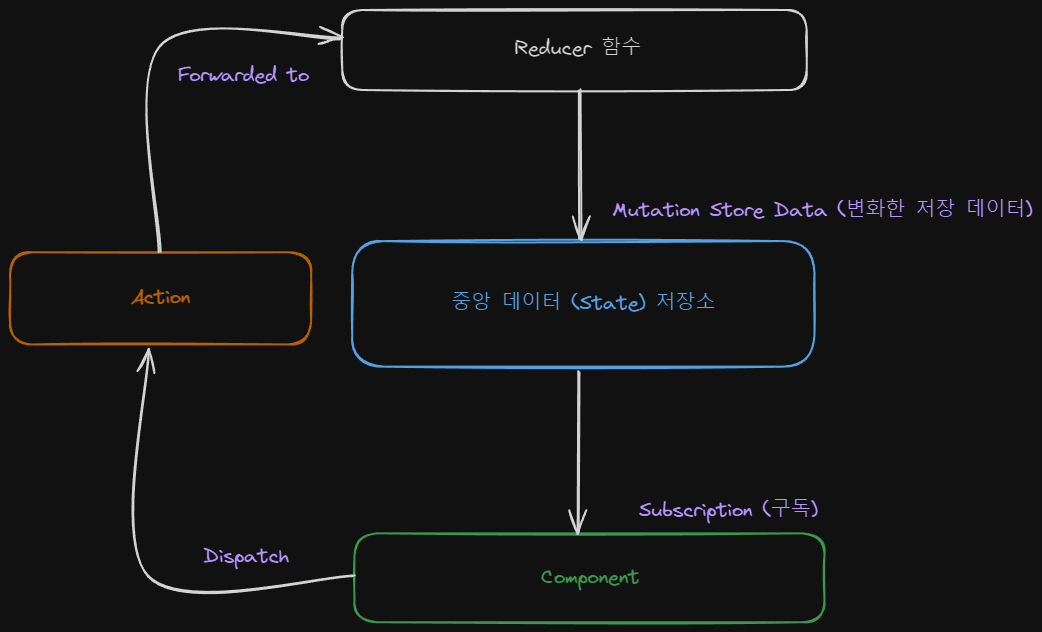
Redux의 작동방식
- 하나의 중앙 데이터 저장소를 구축한다.
- 컴포넌트가 중앙 저장소를
구독하게 한다. - 컴포넌트는 구독한 저장소에서 필요한 데이터(상태)를 받아올 수 있다.
- 컴포넌트는 Redux의 상태를 절대 직접 건들지 않는다.
- Reducer 함수를 통해서 Store의 상태를 변경한다.
데이터는 Store → Component 단방향으로 흐른다.
- Reducer 함수는
순수함수여야 한다.- 필연적으로 새로운 상태를 반환하게 되며, 그것은 예측 가능해야 하기 때문
- 반환된 값이 기존 상태를 대체하게 된다.
React 와 Redux
- Redux는 React 에 국한된 패키지가 아니다.
- redux, react-redux 패키지 설치 필수
카운터 예제 store 생성 코드
1
2
3
4
5
6
7
8
9
10
11
12
13
14
15
16
17
18
19
20
21
22
23
24
25
/** src \ store \ index.js*/
import { createStore } from "redux";

const counterReducer = (state = { counter: 0 }, action) => {
  switch (action.type) {
    case "increment": {
      return {
        counter: state.counter + 1,
      };
    }
    case "decrement": {
      return {
        counter: state.counter - 1,
      };
    }
    default: {
      return state;
    }
  }
};

const store = createStore(counterReducer);

export default store;
store 제공하기
1
2
3
4
5
6
7
8
9
10
11
12
13
14
15
16
/** project 최상위 index.js 파일 */
import React from "react";
import ReactDOM from "react-dom/client";
import { Provider } from "react-redux";

import "./index.css";
import App from "./App";
import store from "./store";

const root = ReactDOM.createRoot(document.getElementById("root"));
root.render(
  <Provider store={store}>
    <App />
  </Provider>
);
- react-redux 에서 Provider 와 작성한 store를 사용하여 App 컴포넌트 전체를 감싼다.
- Provider의 store 속성에 작성한 store를 바인딩 시킨다.
store 사용하기
- useSelector 라고 하는 ‘react-redux’ 에서 만들어진 커스텀 훅을 사용
- store에서 원하는 프로퍼티만 꺼내 쓸 수 있으며, 사용을 선언하면, 해당 컴포넌트는 store를 구독하게 된다.
1
2
3
4
5
6
7
8
9
10
11
12
13
14
15
16
17
18
19
20
21
22
import classes from './Counter.module.css';

// useSelector 사용
import { useSelector } from 'react-redux';

const Counter = () => {
	// store 에서 counter 프로퍼티만 추출
  const counter = useSelector(state => state.counter);

  const toggleCounterHandler = () => {};

  return (
    <main className={classes.counter}>
      <h1>Redux Counter</h1>
      <div className={classes.value}>-- COUNTER VALUE --</div>
      <button onClick={toggleCounterHandler}>Toggle Counter</button>
    </main>
  );
};

export default Counter;
- 위 코드에서는 store의 counter 프로퍼티를 구독 했기 때문에, counter 프로퍼티의 값이 변경사항이 생기면, 컴포넌트 함수가 재실행(리 렌더링) 된다.
컴포넌트에서 action, dispatch 사용하기
1
2
3
4
5
6
7
8
9
10
11
12
13
14
15
16
17
18
19
20
21
22
23
24
25
26
27
28
29
30
31
32
33
34
/** components \ counter.js*/

import classes from "./Counter.module.css";

import { useSelector, useDispatch } from "react-redux";

const Counter = () => {
  const counter = useSelector((state) => state.counter);
  const storeDispatch = useDispatch();
  const toggleCounterHandler = () => {};

  const incrementHandler = () => {
    storeDispatch({ type: "increment" });
  };

  const decrementHandle = () => {
    storeDispatch({ type: "decrement" });
  };

  return (
    <main className={classes.counter}>
      <h1>Redux Counter</h1>
      <div className={classes.value}>{counter}</div>
      <div>
        <button onClick={incrementHandler}>Increment</button>
        <button onClick={decrementHandle}>Decrement</button>
      </div>
      <button onClick={toggleCounterHandler}>Toggle Counter</button>
    </main>
  );
};

export default Counter;
- useDispatch 훅 사용
- useDispatch 객체 할당 ⇒ storeDispatch 변수
- storedispatch(action) 의 방식으로 사용
redux-toolkit 사용
- 설치
1
npm install @reduxjs/toolkit
- createSlice 사용
- 기존 redux로는 reducer 함수를 만들었는데, redux-toolkit은 slice를 이용하여 전부 만든다.
- createSlice로 만든 reduce함수는 기존의 상태를 변경하지 않고, 이전 상태를 기억했다가 복제 한다.
- redux-toolkit 으로는 상태를 직접변경할 수 없기에, 불변성을 더 쉽게 지킬 수 있다.
1
2
3
4
5
6
7
8
9
10
11
12
13
14
15
16
17
18
19
20
21
22
23
import { createSlice } from "@reduxjs/toolkit";

/** Redux - Toolkit */
const counterSlice = createSlice({
  name: "counter",
  initialState,
  reducers: {
    increment(state) {
      state.counter++; // 기존 return 문이 이렇게 바뀐다.
    },
    decrement(state) {
      state.counter--;
    },
    increase(state, action) {
      //필요하면 여전히 action을 입력 받을 수 있다.
      state.counter = state.counter + action.payload.step; // payload 키에 type을 제외한 모든 인수를 저장한다.
    },
    toggleCounter(state) {
      state.showCounter = !state.showCounter;
    },
  },
});
- configureStore 로 store 객체 생성
1
2
3
4
5
6
7
8
9
10
11
12
13
14
15
// store 생성
// 1. 전역 Reducer가 1개 일때
const store = configureStore({
  reducer : counterSlice.reducer, // 전역 상태를 담당하는 slice reducer 사용
})

// 2. 전역 Reducer 가 여러개 일 때
const store = configureStore({
	reducer: {counter : counterSlice.reducer, timer : timerSlice.reducer}
	// 각 key가 state 의 접근 식별자 역할까지 한다.
})

// 기존의 reducer 분류를 위한 actions 가 자동으로 생성되어있으며 각각 method들에는 고유 식별자가 생겨있다.
export const counterActions = counterSlice.actions;
export default store;
- Counter.js 컴포넌트 reduxt-toolkit으로 마이그레이션
1
2
3
4
5
6
7
8
9
10
11
12
13
14
15
16
17
18
19
20
21
22
23
24
25
26
27
28
29
30
31
32
33
34
35
36
37
38
39
40
41
42
43
44
45
46
/** Counter.js */

import { counterActions } from "../store/index.js";
import classes from "./Counter.module.css";

import { useSelector, useDispatch } from "react-redux";

const Counter = () => {
  const counter = useSelector((state) => state.counter);
  const showCounter = useSelector((state) => state.showCounter);
  const storeDispatch = useDispatch();
  const toggleCounterHandler = () => {
    // storeDispatch({ type: 'showcounter' });
    // 위가 기존 redux 방식, 아래가 reduxt-toolkit 방식
    storeDispatch(counterActions.toggleCounter());
  };

  const incrementHandler = () => {
    // storeDispatch({ type: 'increment' });
    storeDispatch(counterActions.increment());
  };

  const decrementHandle = () => {
    // storeDispatch({ type: 'decrement' });
    storeDispatch(counterActions.decrement());
  };

  const increaseHandler = (step) => {
    // storeDispatch({ type: 'increase', step });
    storeDispatch(counterActions.increase({ step }));
  };
  return (
    <main className={classes.counter}>
      <h1>Redux Counter</h1>
      {showCounter && <div className={classes.value}>{counter}</div>}
      <div>
        <button onClick={incrementHandler}>Increment</button>
        <button onClick={() => increaseHandler(5)}>Increment By 5</button>
        <button onClick={decrementHandle}>Decrement</button>
      </div>
      <button onClick={toggleCounterHandler}>Toggle Counter</button>
    </main>
  );
};

export default Counter;
- toolkit 으로 생성된 reducer method 들은 각자 호출을 위한 고유 id 값이 actions 에 전부 저장되어있다.
다중 Slice 작성
auth-slice.js
1
2
3
4
5
6
7
8
9
10
11
12
13
14
15
16
17
18
19
20
21
22
  import { createSlice } from "@reduxjs/toolkit";

  const initialAuthState = {
    isAuthenticated: false,
  };

  const authSlice = createSlice({
    name: "authentication",
    initialState: initialAuthState,
    reducers: {
      login(state) {
        state.isAuthenticated = true;
      },
      logout(state) {
        state.isAuthenticated = false;
      },
    },
  });

  export const authActions = authSlice.actions;
  export default authSlice;
counter-slice.js
1
2
3
4
5
6
7
8
9
10
11
12
13
14
15
16
17
18
19
20
21
22
23
24
25
26
27
  import { createSlice } from "@reduxjs/toolkit";

  const initialCounterState = { counter: 0, showCounter: true };
  /** Redux - Toolkit */
  const counterSlice = createSlice({
    name: "counter",
    initialState: initialCounterState,
    reducers: {
      increment(state) {
        state.counter++; // 기존 return 문이 이렇게 바뀐다.
      },
      decrement(state) {
        state.counter--;
      },
      increase(state, action) {
        //필요하면 여전히 action을 입력 받을 수 있다.
        state.counter = state.counter + action.payload.step; // payload 키에 type을 제외한 모든 인수를 저장한다.
      },
      toggleCounter(state) {
        state.showCounter = !state.showCounter;
      },
    },
  });

  export const counterActions = counterSlice.actions;
  export default counterSlice;
store/index.js
1
2
3
4
5
6
7
8
9
10
  import { configureStore } from "@reduxjs/toolkit";
  import counterSlice from "./counter-slice";
  import authSlice from "./auth-slice";

  const store = configureStore({
    reducer: { counter: counterSlice.reducer, auth: authSlice.reducer }, // 전역 상태를 담당하는 slice reducer 사용
  });

  export default store;
Counter.js
1
2
3
4
5
6
7
8
9
10
11
12
13
14
15
16
17
18
19
20
21
22
23
24
25
26
27
28
29
30
31
32
33
34
35
36
37
38
39
40
41
42
43
44
  import { counterActions } from "../store/counter-slice.js";
  import classes from "./Counter.module.css";

  import { useSelector, useDispatch } from "react-redux";

  const Counter = () => {
    const counter = useSelector((state) => state.counter.counter);
    const showCounter = useSelector((state) => state.counter.showCounter);
    const storeDispatch = useDispatch();
    const toggleCounterHandler = () => {
      // storeDispatch({ type: 'showcounter' });
      storeDispatch(counterActions.toggleCounter());
    };

    const incrementHandler = () => {
      // storeDispatch({ type: 'increment' });
      storeDispatch(counterActions.increment());
    };

    const decrementHandle = () => {
      // storeDispatch({ type: 'decrement' });
      storeDispatch(counterActions.decrement());
    };

    const increaseHandler = (step) => {
      // storeDispatch({ type: 'increase', step });
      storeDispatch(counterActions.increase({ step }));
    };
    return (
      <main className={classes.counter}>
        <h1>Redux Counter</h1>
        {showCounter && <div className={classes.value}>{counter}</div>}
        <div>
          <button onClick={incrementHandler}>Increment</button>
          <button onClick={() => increaseHandler(5)}>Increment By 5</button>
          <button onClick={decrementHandle}>Decrement</button>
        </div>
        <button onClick={toggleCounterHandler}>Toggle Counter</button>
      </main>
    );
  };

  export default Counter;
Auth.js
1
2
3
4
5
6
7
8
9
10
11
12
13
14
15
16
17
18
19
20
21
22
23
24
25
26
27
28
29
30
31
32
33
  import { useDispatch } from "react-redux";
  import classes from "./Auth.module.css";
  import { authActions } from "../store/auth-slice.js";

  const Auth = () => {
    const storeDispatch = useDispatch();

    const loginHandler = (event) => {
      event.preventDefault();
      storeDispatch(authActions.login());
    };

    return (
      <main className={classes.auth}>
        <section>
          <form onSubmit={loginHandler}>
            <div className={classes.control}>
              <label htmlFor="email">Email</label>
              <input type="email" id="email" />
            </div>
            <div className={classes.control}>
              <label htmlFor="password">Password</label>
              <input type="password" id="password" />
            </div>
            <button>Login</button>
          </form>
        </section>
      </main>
    );
  };

  export default Auth;
이 기사는 저작권자의 CC BY 4.0 라이센스를 따릅니다.